For most players, the first and primary interaction with the universe is their character. This is your avatar in the galaxy of Asteria. The following is a simple step-by-step process to create your character; in general, the goal is to allow players to be whatever they want to be, and the choices you make reflect this. Generally, only background, skills, and exploit choices have a noticeable effect on the actual gameplay; race usually only matters if the Guide or story demands it.
Step 1: Obtain Character Sheet
You’re welcome to use our provided character sheets for free: Character sheets or any device capable of retaining custom information, be it written or digitally will suffice.
Step 2: Choose a Race
Asteria is populated by a wide variety of species, some more alien than others. Much of the lore revolves around supporting genetic diversity, so more races can easily be created and added if you so choose. You can check the races page for more details about the lore of Asteria’s standard races. While there is no statistical advantage to one race over another, size plays a minor part in life in the Asteria galaxy. Our goal with races is primarily to allow players maximal freedom in how they might wish to define their character’s identity without undue penalization. Size does sometimes play a role though: whether being too large to find adequate cover in a firefight or being small which will increase the difficulty to move a boulder. You and your Guide might decide on benefits or disadvantages not related to size if you so choose, but these are not part of the game as intended so that any race could do any role you can imagine.
Step 3: Choose a Background
In Asteria, your background can be equated with other games’ classes. These will determine what special abilities are available to you, what your starting money and skill points will be, how many skill points you get per level, and how much money you get from completing missions. Much of Abide Asteria’s balance comes from the differences between wealth and skill; there are more details in the backgrounds page. Keep in mind, experience earned and money are linked, but experience points are not modified by background; for example, a captain gets a 3x bonus to mission pay, but this does not mean he levels any faster than his crewmates, who receive ½ mission pay – only that he’s probably overpaid for the work he does!
Step 3b: Filling out Character sheet with Background info.
Fill in your selected background on the character sheet. Note the following, feel free to use the provided guide for a “Crew Member” background.
- Starting SP (Skill Points)
- SP (Skill Points) gained on level up
- Starting Funds
- Pay out per mission
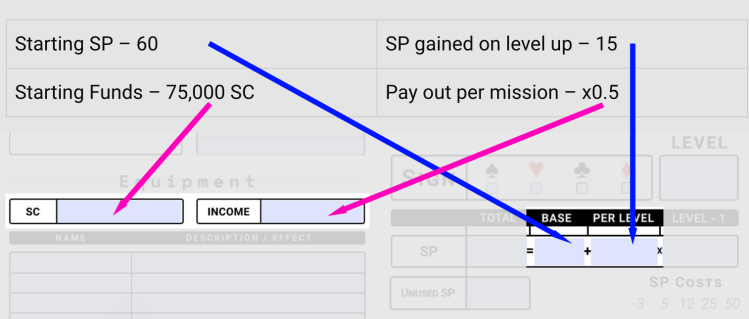

Step 3c: Calculating SP (Optional)
Thankfully your starting Skill Points (SP) is always the “Starting SP” value if you start at level 1. However if you start at a later level or get lost at some point along your adventure, it’s nice to easily be able to calculate your SP. To do this make sure your level is current. In our example on the left we have Crew Member who is level 1.
Calculating SP looks something like this 60=60+(15×0) the 0 represents your level minus 1, if you were level 2 this would be a 1, 3 would be 2 and so on. This allows you to come up with a really fast way to check your current SP.
Example: 90=60+(15×2)
Step 4: Choose Skills
This is the most important part in terms of statistics as well as customizing your character. Many events in this game require a test of skill, whether it is firing a pistol with a ranged weapon check or fixing a broken STS engine with your mechanical repair skill. Your level of training with a skill determines how effective you might be with that skill through the use of technique. Techniques are best thought of as ‘card chains’ – matching suits under the various technique rules to increase your total. More details on techniques are found under the skills section, as well as information on what skills are and what actions might fall under them. As for how many skills: your background determines your skill progression, though you can also place ‘natural blocks’ on some skills for extra points. These disadvantage you rather heavily for the skill you’ve chosen to block, and natural blocks cannot be removed later. They do, however, grant you 3 extra skill points at character creation, so choose wisely. When progressing from one tier to the next, you only pay the difference. Example: If you have a Trained skill and want to upgrade Advanced Trained, you’ll only pay 7 points, not all 12 again.

Step 6: Choose Exploits
Exploits are meta-game abilities, designed to either manipulate your luck with the deck or your character’s interactions with the world. More information can be found in the exploits section. You receive one exploit at first level, another at second, and then three more exploits at levels five, eight, and fourteen respectively, for a total of five exploits. (Six Including “The Big Red Button”)
Step 5: Choose a Sign
Choose a suit of cards, either hearts, diamonds, spades, or clubs. This statistic is referenced by a few random events under Guide purview, and the recovery chance at the start of combat rounds. It has no other appreciable effect on your character. This is mainly to flavor your character. The four main suits basic properties are Spades, physical; Hearts, mental; Clubs, technology; Diamonds, magic.
Step 7: Choose your Equipment
Equipment can help decide what your character can do or accomplish in Asteria and is the final step of character creation. Much as with skills, your background will determine your starting SC (Spell Credits). With a lower-payout background, you might struggle to choose the right gear, while with a higher-payout background, you might be expected to make purchases for the party, especially if you’re a captain buying the crew’s ship. Remember that you can’t fire a gun if you don’t have one, and the armor you aren’t wearing won’t protect you – so choose wisely based on your expectations of what your character should do and what the group needs!
Step 8: Character Info
If you haven’t already, you’ll want to name your character. In addition to that you’ll want to add some basic information about your character on the second page, like height, weight, age, ect. Feel free to be as thorough as you’d like, most guides might agree that in-depth stuff should be optional or will be filled out as you play. A good example of sections that don’t need to be filled out on new character creation is contacts and notes.
Finished!
Thank you for choosing to play Abide Asteria.
Suggestions? Comments? Just love Abide Asteria? Join our Discord or use our Contact Us page, we want to hear from you!
